samedi 16 novembre 2019

Loosely coupled Applications using AWS SQS and SNS

Introduction

With massive growth of IoT, cloud industry rushes to provide scalable, reliable, resilient and secure ways to process and store enormous data coming from various devices around the world.
Old self hosted data-centers within companies are deprecated and obsolete as they lack in scaling, difficult to maintain and can get quickly expensive. In short, these kind of platforms are overwhelmed by sudden rise of data.
With Modern problems, comes modern solutions; as you may already have guessed, it's AWS Web Services.

Getting powers from AWS cloud

What is AWS?

Amazon became a pioneer in cloud services technology (more than 195 services : https://aws.amazon.com/?nc1=h_ls). The most particularly common ones used in the wild are :
  • EC2 : Cloud computing service (IaaS), AWS offers also "load balancers" and "autoscaling groups" to handle any kind of traffic.
  • S3 : Storage cloud service (can hold even files with size up to 5TB).
  • RDS and DynamoDB : SQL (6 different database technologies are supported : MySQL, MariaDB, PostgreSQL, Oracle, MS SQL Server and Amazon Aurora) and NoSQL databases respectively.
  • SQS : Queue service used to hold data until consumed.
  • SNS : Notification service that acts as a message broker (dispatches messages from publishers to subscribers).

Interact with AWS services

AWS services can be accessed in 4 different ways :
  • Web console interface : one can use a web browser to navigate through various services and access most settings (the one used in this article).
  • CLI interface : suitable for daily tasks. Ideal for administrators.
  • Amazon SDK : AWS provides multiple SDK's for various programming languages (Python, Java, NodeJS, PHP and Android) to interact with AWS resources (subject to permissions).
  • HTTP(s) requests : get and put requests are allowed to retrieve information and resources status.

Need for AWS

As embedded systems engineers; We need to collect, store and process enormous amount of data gathered from different smart devices powered by various technologies. A classical approach would as shown below :
The above configuration is simple to implement, it only requires few steps :
  • Enable NAT port forwarding on the company's router to allow external entities (Smart watches, Google glasses, Raspberry pi, Arduino, ..., etc) to reach your "Backend Server" (which runs a server side language like PHP or NodeJS) through provided REST APIs.
  • Choose the database technology for your storage server : Relational (MySQL, PostgreSQL, ORACLE, ...,etc) or NoSQL (InfluxDB, Cassandra, MongoDB, ..., etc.) depending on your needs.
  • Write some code on the backend (in addition to the code that provides the APIs) to read and process the data stored in the "Storage Server" whenever the front-end (browser) asks for it.
The above configuration will work fine but won't last for long.

As the number of collected data becomes important, more challenges need to be
solved :
  • Database Scaling : imagine receiving millions of data per day, how can we make them fit into the above configuration? and how to replicate them?.
  • System's redundancy : difficult to ensure 99.999999% reachable network (maintenance is usually required, remember the message : "We Will be back soon" on your favorite websites. Classical network are quickly flooded by huge amount of traffic.
  • Security : Data in transit and data at rest must be protected. Yet, most companies fail to achieve this requirement.
  • Not cost effective : need to pay for power consumption, cooling and maintenance.
Using a cloud solution like AWS, the above issues become a piece of cake to solve.

Let's introduce AWS to the above schematic which yields :

Let's answer the questions asked so far :
  • Storage system : AWS databases (like dynamoDB) are scalable, one can store limitless amount of data. AWS replicates automatically your data over various availability zones and sometimes even over different regions.
  • System's redundancy : AWS services are guaranteed to be accessible more than 99.999999% of time.
  • Security : AWS is very known for it's security, one can tune access controls for every device and user. Some AWS services are even PCI compliant like SQS (Certified to transmit sensitive data like credit card information).
  • Cost effective : as it provides a pay as you go (it may even be completely free if your have very low traffic).
With more than 190 services in AWS, We can implement a solution in different ways based on performance, latency and costs.

SNS and SQS AWS services

Let's make this as a getting started and discover two widely used AWS services : SQS and SNS. Most of the time, they are combined together to build Loosely coupled applications.
  1. SNS (Simple Notification Service) : also called push service (follows Publish-Subscribe model). Publisher can send messages and notifications to an SNS topic which dispatches them to every subscriber.
    Important : Notification's size must not exceed 256 KB in SNS.
  2. SQS : also called a pull service. It allows to store messages (for a maximum of period of 14 days) in scalable queues. Your application can consume asynchronously the data stored in those queues (messages will be deleted at the moment your app confirms that it has successfully processed it). For a developer, SQS means :
    • Your network won't be hit by sudden spike requests as they are collected by Amazon.
    • You have plenty of time to setup storage space on your network (in case you don't want to store those data in Amazon's services like DynamoDB).
The above two services are usually combined together to form a special configuration called "fan out".

Simple problem example

As a working example, let's say that your company sells "Geolocation Tags" for different customers. You need to process the data coming from all these Tags (storage, security, data statistics, ..., etc). Without a robust cloud setup, your network will not survive.
As we have already stated, SQS and SNS are commonly used to build loosely coupled apps. Generally, they are combined to form the famous "fan out" configuration as shown below :
We can see clearly from the above configuration :
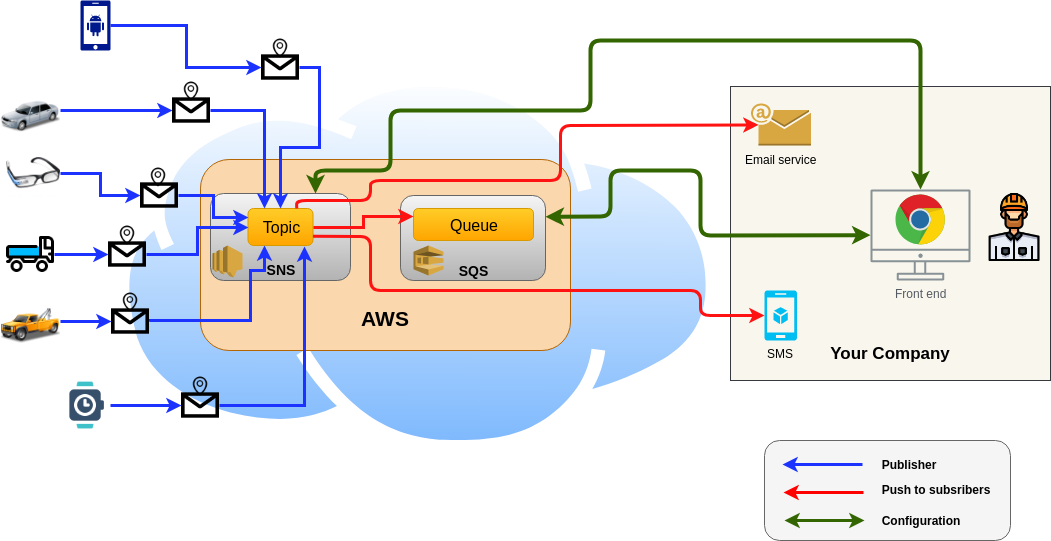
  • All devices publish data to a single SNS topic.
  • SNS relays all received data to all topic's subscribers (including SQS, an email account or even sending SMS to your phone is those are subscribed).

Let's implement the above setup using AWS. You need to have an account to follow the demo presented in this article. Though, there some notes you need to remember while using your AWS account :

  • Never work directly with the root account (as it has all privileges eve, access to billing information).
  • Create a IAM user, save it's ACCESS and SECRET keys and grant it SNS and SQS accesses. 

After successful login to your account, you would see the following console shown below :


AWS classifies services into categories which makes it easy to navigate through them (one can use the search bar to access a specific service quickly).

Setting up AMAZON SNS

  1. Type in the search bar "SNS" as shown below :
  2. AWS prompts you to write down a topic name :
    then click on "next step".
  3. AWS asks for an optional detail which is displayed as a subject in case of sending an email or an SMS :
    Let's keep the configuration simple. Then click "Create topic" in the bottom page.
  4. Check your settings in the resume page :
    Congratulation, Your SNS topic is up and running (The ARN in the picture above identifies your topic, we're going to need it for publication).

Setting up Amazon SQS

  1. Browse to SQS (just use the search bar as we did previously with SNS),
  2. Enter a queue name, and choose a queue type (Standard or FIFO); We're going to choose Standard in this example as shown below :
    then click on quick queue creation (we're going to dive into more details in the next articles).
  3. Check your queue settings in the summary page :
  4. Subscribe the queue to SNS service :
    • Right click on the freshly created queue as shown below : and choose the option "Subscribe to SNS topic".
    • You only need to select to corresponding SNS topic to which you need to subscribe : then click on "subscribe".
    • At this step, the SQS queue is subscribed and will receive all messages that are sent to your SNS topic (see confirmation page below).
  5. Add your email address as a subscriber (optional) :
    1. Browse to SNS, and select your topic. Scroll down and click on the button "add subscriber" as shown below :
    2. Fill the form with your corresponding email address as illustrated below :
      A confirmation email will be sent to your email account (just click on the confirmation link). Now, every time a message is received by SNS; it will be dispatched to both SQS and your email address.

Test a design using AWS tools

AWS ships with multiple tools to test different services and check the correctness of interactions between them.
As a Rule of thumb, always check your work using AWS tools before writing any code on your side (this can save hours of debugging).

We're going to take a look to a ready to use tool able to send messages to our SNS topic.
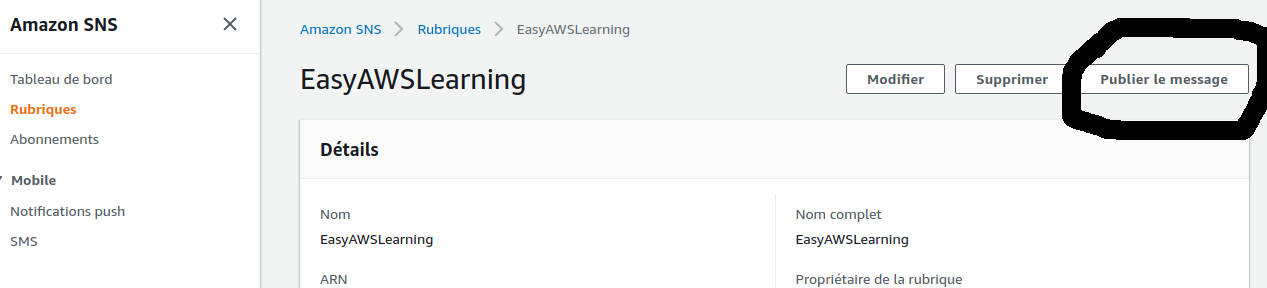
  1. Navigate to your SNS topic as shown below :
    and click on "publish message" button (which allows to send a message to your topic).
  2. An empty message template would appear :
    • Fill the object field :
    • Write your message in the body block : Then click on "Publish Message" in the bottom of the page.
  3. Check message delivery :
    • Browse to your SQS queue and observe that the number of messages has changed : You can click on it and read it's content.
    • If you have registered your email to SNS in the last step, you should receive an email as well :
Now, our system is working properly; let's have some python code to read the content of our SQS queue.

Simple publisher

As mentioned previously, AWS provides various SDKs to interact with it, here is an example of using python and the famous boto3 SDK. 

Publishing a message to SNS is simple as shown below :
import boto3

# Create an SNS client
client = boto3.client(
    "sns", # Choose SNS service
    aws_access_key_id="YOUR_ACCESS_KEY", # equivalent to username
    aws_secret_access_key="YOU_SECRET_KEY", # equivalent to password
    region_name="us-east-1"
)

# Send your sms message.
client.publish(
    TopicArn='arn:aws:sns:us-east-1:YOUR_ACCOUNT_NUMBER:EasyAWSLearning',
    Subject='ALERT MESSAGE AWS',
    Message="Hello World from AWS!"
)
Opening the message content in SQS should yield :

And because I have registered my email address to SNS, the message will be relayed to my account :


Conclusion

Any organization can delegate the bulky work of maintaining, storing and processing millions of data to AWS. the latter ensures high availability, reliability and security. With more than 195 services, it became the de-facto choice when building scalable and resilient applications. Netflix has even moved a big portion of it's streaming operations into AWS.
Today, we have made a first step into Amazon SNS and SQS in order to give the reader more insight into the world of Amazon services.

More articles will be available soon with more details. Have fun!

dimanche 24 mars 2019

Adding custom syscall to Linux

Introduction

System calls (abbreviated syscalls) are the gateway for userspace applications to kernel. They are used to ask the kernel to provide a service (like reading or writing a file content, ..., etc).

An exhaustive list of syscalls is available at : http://man7.org/linux/man-pages/man2/syscalls.2.html.

Monitoring system calls from userspace

One can use strace to track different system calls make by an application toward the kernel. The following shows an example of syscalls made by ls:

We can clearly see the different system calls (open, close, mmap, fstat, ..., etc).

Custom system call

Setting up Linux sources

Getting Linux kernel sources

Let's download the Linux sources from https://www.kernel.org/ as shown below :

$ wget https://cdn.kernel.org/pub/linux/kernel/v5.x/linux-5.0.2.tar.xz

Note : At the time of writing this post, Linux 5.0.2 is the latest version.

Decompress the sources

One the sources have been downloaded, We need to decompress and copy them into /usr/src as follow:
$ sudo tar -xvf linux-5.0.2.tar.xz -C /usr/src/

Install required packages

The following packages are required to successfully compile a linux kernel :
$ sudo apt-get install build-essential flex libncurses5-dev bison libssl-dev libelf-dev

Adding a syscall

Declaring the syscall prototype

System call prototypes are declared in : linux-sources/include/linux/syscalls.h.
In our case; We need to add our custom syscall prototype into /usr/src/linux-5.0.2/include/linux/syscalls.h. One can follow the steps given below :

$ cd /usr/src/linux-5.0.2
$ sudo nano include/linux/syscalls.h

Then add you syscall prototype at the end of the file before #endif.

Syscall implementation

  • Create a folder at the root of the sources, let's call it custom_syscall.
    $ cd /usr/src/linux-5.0.2
    $ sudo mkdir custom_syscall
    $ cd custom_syscall
    
  • Add the syscall implementation source file :
    $ sudo nano custom_syscall.c
    

    and provide a Makefile :

    $ sudo nano Makefile
    
  • Add you syscall to the Linux Main Makefile
    $ cd /usr/src/linux-5.0.2
    $ sudo nano Makefile
    
  • Adding syscall to system call table
    $ cd /usr/src/linux-5.0.2/arch/x86/entry/syscalls/
    $ sudo nano syscall_64.tbl
    

Compiling Linux kernel sources

At this step, The linux source directory should look like the following:
  • Create a Linux image : one can call make command passing it the number of processors*2 (to speed up compiling process by using multiple processors).
    For example, I have 2 processors on my machine, so I have to call make as follow:
    $ sudo make -j4
    
    Where 4 is the number of processors on my machine * 2.
  • Compile modules :
    $ sudo make modules_install install
    
    The above command generates a bench of files like : vmlinux-5.0.2 and system.map-5.0.2. One may take a look at the boot folder :
  • Check you kernel version before reboot :
  • Reboot your system :
    $ sudo shutdown -r
    
  • Check your new kernel version :

Testing system call

  • Write a test program : The function syscall performs a generic system call. It's prototype is defined as follow:
    long int syscall (long int sysno, ...)
    
    The extras arguments are the arguments of the syscall, however; our system call does not have any argument. One may write a test code as shown below :
    #include <stdio.h>
    #include <linux/kernel.h>
    #include <stdlib.h>
    #include <sys/syscall.h>
    #include <unistd.h>
    
    int main(int argc, char *argv[]){
        // 335 is the syscall number defined in syscall_64.tbl
     long int sysReturnCode = syscall(335);
     printf("Syscall returned value :%ld\n", sysReturnCode); 
     return EXIT_SUCCESS; 
    }
    
  • Read syscall output : Use the dmesg command which should yield :
Congratulations! Now, try to create more enhanced systemcall (and put them in the comments below).

dimanche 10 février 2019

Device management using Udev

Introduction

udev is a device manager running as a daemon "udevd". It captures devices events sent by the kernel to userspace.
After receiving an event from the kernel, udev creates an entry in /dev directory for the device (In fact, the job of udev is to dynamically populate this folder).

udev general concepts

One can monitor events related to devices in 2 steps :
  • Launch udev monitor in order to catch events received by udev :
    $ udevadm monitor
    
  • Insert a device (I'm going to test using my USB stick).
The above steps are summarized in the picture below :

Removing the usb stick yields :

udev rules

Users may customize the behavior of udev, for example :
  • Change the name of device driver file in /dev or simply create symbolic links.
  • Execute a program when some event related to a device is triggered (for example call a program to copy pictures when my phone is inserted to my computer).
However, in order to set a custom behaviour, one must understand the concept of udev rules.

udev rules

Rules instructs udev for what to do when certain condition (or conditions) becomes valid (for instance : when usb stick which has PID=0x000f and VID=0x1234 is inserted).
  • Rules are typically stored in "/etc/udev/rules.d/" folder and carry the extension ".rules".
  • Rules are named using number-rulename.rules convention, so 10-usbstick.rules or 99-formatunknownusb.rules can be valid udev rule names (most often, numbers are choosed between 10 and 99).
  • udev rules are parsed in lexical order.

When udev starts, it parses /etc/udev/rules.d/ folder and builds udev rules table. Upon receiving an event, udev goes through it's rule table looking for rules to apply.

udev rule syntax

A rule is made up from 2 blocks, a matching condition and an action :

  • Matching condition : tells udev when to execute a rule.
  • Action : instructs udev what to do when matching condition is satisfied.

Udev matching conditions

Conditions are defined using the following keywords :
  • ACTION : can have values : add (when device in inserted), remove(when device is removed) or change(when device changed state.).
  • KERNEL : name of device as reported by the kernel.
  • SUBSYSTEM : name of subsystem containing the device (in /sys).
  • ATTR : device attributes like size, product id (PID), vendor id (VID), etc, ...

A udev rule example for my usb stick is shown below :

ACTION=="add", KERNEL=="sdb1", ATTR{size}=="126859264"

We can notice that == was used to test the condition, other compactors are also possible like: !=.

Remark : one should not confuse ACTION keyword with udev actions.

We are going to learn later how to find valid matching expression for any device.

udev actions

Conditions are defined using the following keywords :
  • NAME : the name of the device file driver in /dev (If not specified, udev uses default name as provided by kernel).
  • SYMLINK : creates symbolic links to device file driver in /dev.

An example that matches my usb stick :

ACTION=="add", KERNEL=="sdb1", ATTR{size}=="126859264", NAME="myfiledrive", SYMLINK+="myfiledrive-0, myfiledrive-1"

udev special commands

Find device matching conditions

One can use udev to list all matching conditions of a certain device as follow :
$ udevadm info -a -p $(udevadm info -q path -n /dev/file_driver_name)

Testing the above command on my usb stick yields :

The output can be broken into 2 parts :

  • Device part (looking at device in previous picture): gives all possible matching conditions for the device (those are enough for most usage).
  • Parents part (looking at parent in previous picture): gives matching conditions for device's parent.

We can mix both of parts together to target a specific device.

Test and debug udev rules

Errors are common when making udev rules (udev does not show errors and ignores the rule from which errors originate), one can enable udev's debugging functionality to track udev's activity :

We can see clearly that our rule has been loaded correctly (try making a syntax error in the rule, you will see a bench of errors).

Examples

Example-1 : Adding Symlink to /dev

  • Add a udev rules to /etc/udev/rules.d/ :

    Note : One must reload udev using $ sudo udevadm control --reload rules using to force udev to take into account the newly created rule.

  • Insert a usb stick and check file entries in /dev :
    Now, programs can interact with your usb stick using myfiledriver-0 or myfiledriver-1 (as they are symbolic links to sdb1).

Example-2 : Formatting unauthorized usb stick

  • Create an eraser bash script (wipe.sh) :
    #!/bin/bash
    
    dd if=/dev/zero of=/dev/sdb1 bs=1k count=2048
    
  • Add executable permission rights to eraser script :
    $ chmod 777 wipe.sh
    
  • Add udev rule :
    # Customize usb stick driver file name
    ACTION=="add", KERNEL=="sdb1", ATTR{size}=="126859264", SYMLINK+="myfiledrive-0 myfiledrive-1", RUN+="/home/jugurtha/wiper/wipe.sh"
    

    The above command will format a usb stick with the corresponding matching creteria.

  • It is important to note that : ATTR{size}!="126859264" can be used to match all devices that are different from Matching condition.

dimanche 13 janvier 2019

Data exchange formats in C++

Introduction

Data exchange formats are a critical building block when multiple platforms and languages interact with each other. Various standards are used in the wild.

Since few years, developers adopted XML and JSON recently as a human readable data format exchange and Google Buffer protocol as a binary data exchange.

However, C++ STL does not offer any support for XML and JSON. One may write a parser (which takes a lot of time), but great libraries are already available.

Data exchange formats

In this post, We are going to take a look at both XML and JSON and how they can handled in C++ (one may take a look at previous post on Google Buffer Protocol).

XML

XML stands for eXtensible Markup Language, standardized since February 1998 by the W3C for storing and transporting data.

Brief introduction to XML syntax

XML relies on tags (as the case for most description languages). But unlike HTML, XML does not use any predefined tags. We are free to create our own tags.

The reader should also remember that XML is used to store and transport data (however HTML focuses on how data should be displayed).

The global syntax of XML is based on hierarchical structure (like HTML) or child and parent-relationship :

An example of XML document would be as shown below :

<?xml version="1.0" encoding="UTF-8"?> <!-- XML prolog -->
<!-- Define root element geeks -->
<geeks>
      <!-- First geek -->
      <geek>
             <name>dennis ritchie</name>
             <year_of_birth>1941</year_of_birth>
             <country_of_birth>USA</country_of_birth>
             <works>
                    <work>C Language</work>
                    <work>UNIX</work>
             </works>
      </geek>

      <!-- Second geek -->
      <geek>
             <name>linus torvalds</name>
             <year_of_birth>1962</year_of_birth>
             <country_of_birth>Finlande</country_of_birth>
             <works>
                    <work>Linux kernel</work>
                    <work>Git</work>
             </works>
      </geek> 

      <!-- Third geek -->
      <geek>
             <name>Eugene Kaspersky</name>
             <year_of_birth>1965</year_of_birth>
             <country_of_birth>Russia</country_of_birth>
             <works>
                    <work>Kaspersky Antivirus</work>
             </works>
      </geek>     
</geeks>
<!-- END OF XML -->

XML in C++

XML can be managed in C/C++ using TinyXML2, an opensource library allowing to parse and create XML documents easily.

One must install TinyXML2 on his/her system before usage :

$ sudo apt-get install libtinyxml2-dev
Parsing XML

Let's parse the content of the XML example provided above using the following code :

#include <iostream>
#include <tinyxml2.h>

using namespace std;
int main(){

    // create main level XML document container
    tinyxml2::XMLDocument xmlDoc;
        
    // load xml file
    if(xmlDoc.LoadFile("geeks.xml") != tinyxml2::XML_SUCCESS)
    {
        cerr << "loading XML failed" << "\n";
        return false;
    }

    // Get reference to root element "geeks"
    tinyxml2::XMLNode* pRoot = xmlDoc.RootElement();
    // Check if pRoot is non empty
    if (pRoot == NULL) return tinyxml2::XML_ERROR_FILE_READ_ERROR;    
    // Display root node    
    cout << "Root Element : " << pRoot->Value() << endl;


    // Traverse root element to get it's children    (geek tags in our example) 
    for(tinyxml2::XMLElement* e = pRoot->FirstChildElement(); e != NULL; e = e->NextSiblingElement())
    {      
        cout << "TAG : " << e->Value() << endl;

        // Traverse each geek tag and read it's content
        for(tinyxml2::XMLElement* subEl = e->FirstChildElement(); subEl != NULL; subEl = subEl->NextSiblingElement()){
       
                if(subEl->Value() == string("name"))
                    cout << "Name : " << subEl->GetText() << endl;
                else if(subEl->Value() == string("year_of_birth"))
                    cout << "Year of birth : " << subEl->GetText() << endl;
                else if(subEl->Value() == string("country_of_birth"))
                    cout << "Country of birth : " << subEl->GetText() << endl;
                else if(subEl->Value() == string("works")){
                    cout << subEl->Value() << " : ";                    
                    for(tinyxml2::XMLElement* works = subEl->FirstChildElement(); works != NULL; works = works->NextSiblingElement()){
                            cout << works->GetText() << " \t";                    
                    }
                    cout << endl;
                }
        }
        cout << "------------------------------------" << endl;    
    }

    return 0;
}

Executing the code above yields the following output :

Save to XML

TinyXML2 can also create valid XML documents, a simple demo would be creating an XML file storing pet's names and their respective ages.

#include <iostream>
#include <tinyxml2.h>

using namespace std;
int main(){
    // Create Main level XML container
    tinyxml2::XMLDocument xmlDoc;
    // Add XML prolog 
    xmlDoc.InsertFirstChild(xmlDoc.NewDeclaration());
    

    // Create XML root node called animals 
    tinyxml2::XMLNode* pRoot = xmlDoc.NewElement("animals");
    // Add pRoot to xmlDoc after prolog    
    xmlDoc.InsertEndChild(pRoot);

    // ************* Add first animal to root node *******
    // create an animal tag
    tinyxml2::XMLNode* animalTag_cat = xmlDoc.NewElement("animal");
    pRoot->InsertFirstChild(animalTag_cat);
    
    // add cat's name and age to animal tag
    tinyxml2::XMLElement* animalName_cat = xmlDoc.NewElement("name");
    // Set animal kind and name
    animalName_cat->SetAttribute("type", "cat");
    animalName_cat->SetText("Oscar"); 
    // Insert cat's name as first child of animal    
    animalTag_cat->InsertFirstChild(animalName_cat);
    // Set cat's age    
    tinyxml2::XMLElement* animalAge_cat = xmlDoc.NewElement("age");
    animalAge_cat->SetText(3); 
    // Insert cat's age as last child of animal    
    animalTag_cat->InsertEndChild(animalAge_cat);   

    // ************* Add second animal to root node *******
    tinyxml2::XMLNode* animalTag_Dog = xmlDoc.NewElement("animal");
    pRoot->InsertEndChild(animalTag_Dog);
    tinyxml2::XMLElement* animalName_dog = xmlDoc.NewElement("name");
    animalName_dog->SetAttribute("type", "dog");
    animalName_dog->SetText("Ace"); 
    animalTag_Dog->InsertFirstChild(animalName_dog);
    tinyxml2::XMLElement* animalAge_dog = xmlDoc.NewElement("age");
    animalAge_dog->SetText(5); 
    animalTag_Dog->InsertEndChild(animalAge_dog);


    // Write xmlDoc into a file
    xmlDoc.SaveFile("animals.xml");
  
    return 0;
}

which produces the output shown below :

JSON

JSON stands for JavaScript Object Notation, a lightweight data exchange format created to replace XML. It became quickly the 1st choice for data transition and transport.

Brief introduction to JSON syntax

JSON has an easier syntax compared to XML, in fact; it looks like Python dictionaries. An example is shown below :

{
    "game_name" : "super mario bross",
    "release_year" : 1985,
    "company" : "Nintendo",
    "developers" : [
                        {"developer" : "Shigeru Miyamoto"}, 
                        {"developer" : "Takashi Tezuka"}
                   ]
}

JSON in C++

Various libraries can be used to parse JSON, though; We are going to focus on the most widely used JsonCpp. It's package can be installed as follow:

$ sudo apt-get install libjsoncpp-dev
Parsing JSON

The following example parses the JSON file providing above (which carries information about super mario bross) :

#include <iostream>
#include <fstream>
#include <jsoncpp/json/json.h>

using namespace std;

int main() {
    // Create an input file stream and load games.json's content
    ifstream ifs("game.json");

    // Create a JSON Reader
    Json::Reader reader;
    Json::Value jsonContentHolder;
    // Parse JSON and load result into obj
    reader.parse(ifs, jsonContentHolder);

    // Display Parser content
    cout << "Game : " << jsonContentHolder["game_name"].asString() << endl;
    cout << "Release Year : " << jsonContentHolder["release_year"].asUInt() << endl;
    cout << "Company : " << jsonContentHolder["company"].asString() << endl;
    
    // create Json::Value object to parse obj["developers"]
    const Json::Value& developers = jsonContentHolder["developers"];
    for (int i = 0; i < developers.size(); i++)
        cout << "----------------- developer : " << developers[i]["developer"].asString() << endl;

    return 0;
}
Executing the above code should yield to the output shown below:
Save to JSON
Writing valid JSON files is also easy using jsoncpp, we provide the example of creating a JSON file storing some countries world's population, population growth rate and country area for year 2018 (information were taken from http://worldpopulationreview.com/countries/).
#include <iostream>
#include <fstream>
#include <jsoncpp/json/json.h>

using namespace std;

int main() {
    
    // Create Json::StyledWriter object to write a JSON file
    Json::StyledWriter styled;

    // JSON content Holder
    Json::Value countriesPopulation;  

    // Add china to countriesPopulation
    countriesPopulation["countries"]["China"]["population"] = 1415045928;
    countriesPopulation["countries"]["China"]["population_percentage_growth_rate"] = 0.39;
    countriesPopulation["countries"]["China"]["country_area_km_square"] = 9706961;

    // Add india to countriesPopulation
    countriesPopulation["countries"]["India"]["population"] = 1354051854;
    countriesPopulation["countries"]["India"]["population_percentage_growth_rate"] = 1.11;
    countriesPopulation["countries"]["India"]["country_area_km_square"] = 3287590;

    // Add france to countriesPopulation
    countriesPopulation["countries"]["France"]["population"] = 65233271;
    countriesPopulation["countries"]["France"]["population_percentage_growth_rate"] = 0.39;
    countriesPopulation["countries"]["France"]["country_area_km_square"] = 551695;

    // Add algeria to countriesPopulation
    countriesPopulation["countries"]["Algeria"]["population"] = 42008054;
    countriesPopulation["countries"]["Algeria"]["population_percentage_growth_rate"] = 1.67;
    countriesPopulation["countries"]["Algeria"]["country_area_km_square"] = 2381741;

    // Create a formatted JSON string
    string sStyled = styled.write(countriesPopulation);

    // Display JSON String
    std::cout << sStyled << std::endl;

    // Write JSON string into a file
    ofstream out("world_population.json", ofstream::out); 
    out << sStyled;
    out.close();    
 
    return 0;
}

Executing the code gives the following :

mardi 25 décembre 2018

ZMQ and Google Buffer Protocol V3

Introduction

ZMQ is high level UNIX sockets abstraction library allowing to send data in binary format (typically in Google Buffer Protocol). Previous articles on this blog already explained both ZMQ and Google Buffer Protocol V2.

Google Buffer Protocol V3

Google Buffer Protocol V3 (also called protobuf) is just a step ahead it's predecessor (It's recommended to read Google Buffer Protocol V2 before going further). As already said in previous article, Google Buffer Protocol lifecycle goes through 3 steps :
  1. Describe the layout of data to transmit in .proto file.
  2. Compile .proto file using protoc (protobuf compiler) to generate corresponding classes.
  3. Use generated classes in your code.
We are going to review the first two steps as they have changed a little from previous version of protobuf.

Protobuf3 layout description

Data must be described using protobuf syntax which looks like regular C structures. An example would be :
syntax = "proto3";

package com_company_atom;

message AtomStructure{
     string atom_name = 1;
     int32  atom_nb_protons = 2;
     int32  atom_nb_neutrons = 3;
     int32  atom_nb_electrons = 4;
     bool   atom_is_radioactive = 5;
}
Let's discuss the structure of a .proto file :

Prootbuf syntax version declaration

This must be the first line (don't insert comments or empty lines before syntax declaration) in proto file. Version-3 is the latest version of protobuf.

Remark : Every proto file must start with a version syntax declaration, otherwise protoc will assume version 2 by default (syntax="proto2").

Package name (optional)

Although being not mandatory, package names will be translated into namespaces (to avoid naming conflicts in your code). One should always include a package name.

Message description

Data content is described using message keyword, and fields are conventional data types (string, bool, int32, int64, float, double, ..., etc).

Some conventions

Naming conventions
  • Message name : message names should have a capital letter for every new word.
  • field names : should be in lower case separated by "_" for every new word.
The following schematic summarizes the above two properties :
Field identifiers

Every field must be given a unique ID starting from 1 (in our example : atom_name have an ID of 1).

One should ask, We do wee need an ID if field names are already unique? The reader should keep in mind that protobuf does serialize field names (because field names as being string in nature requires more bytes). Protocol buffer serializes only field type + field ID.

Remark : When field ID is less than 16, only one byte is required to serialize field type + field ID

Protoc V3

Protoc-V3 is not available in repository as this time of writing (only Protoc-V2 can be found).

Installing protoc-V3

One can easily download and compile protoc sources as follow:
  • Getting required dependencies :
    $ sudo apt-get install autoconf automake libtool curl make g++ unzip
    
  • Download protobuf-all-[VERSION].tar.gz (this compiler can generate protobuf classes for various languages like Python and C++) from https://github.com/protocolbuffers/protobuf/releases.
  • Compile sources as shown :
    $ cd protobuf
    $ ./configure
    $ make
    $ sudo make install
    $ sudo ldconfig # refresh shared library cache
    

Compiling proto buffer files

As We have already mentioned, protoc can compile proto files to multiple programming languages. The general compilation syntax :
$ protoc --[LANGUAGE]_out=[OUTPUT_GENERATED_CLASS_DIRECTORY] [PATH_PROTO_FILE]
An example is shown below: Some remarks :
  • C++ : protoc generates two files : fileName.pb.h (to include in your code) and fileName.pb.cc (to include for compilation).
  • Python : protoc generates one file fileName_pb2.py (to be imported in your code).

Classes generated by protoc contain at least setters and getters for every field name.

Working with protobuf

Let's have a practical example in both Python and C++ and see how We can serialize our data using Google Protocol Buffer.
  1. Writing a proto file :
    syntax = "proto3";
    
    package com_company_pet;
    
    message PetIdentity{
        string pet_name = 1;
        int32  pet_age = 2;
        bool   pet_gender = 3;
    }
    
    
    // petIdentity.proto
    
  2. Generating protobuf classes :
    $ protoc --cpp_out=. petIdentity.proto
    $ protoc --python_out=. petIdentity.proto
    
  3. Using protobuf classes in our code:
    • Python :
      # main.py
      # import petIdentity_pb2 module
      import petIdentity_pb2
      import sys
      
      
      print("-------- Serializing data -------")
      # Create an instance of PetIdentity
      petIdentity = petIdentity_pb2.PetIdentity()
      
      
      # Fill PetIdentity instance
      petIdentity.pet_name = "Oscar";
      petIdentity.pet_age = 2;
      petIdentity.pet_gender = True;
      
      # Serialize PetIdentity instance using protobuf
      petIdentitySerialized = petIdentity.SerializeToString()
      
      # display serialized data
      print("Serialized Data : " + petIdentitySerialized) 
      
      print("") # add empty line
      
      print("-------- Deserializing data -------")
      # Create an instance of PetIdentity for deserialization
      petIdentityDeserialized = petIdentity_pb2.PetIdentity()
      
      # Deserialize Serialized data
      petIdentityDeserialized.ParseFromString(petIdentitySerialized)
      
      # Display deserialized data
      print("Cat-Name : " + petIdentityDeserialized.pet_name + " <===> Cat-age : " + str(petIdentityDeserialized.pet_age) + " <===> Cat-gender : " + ("male" if petIdentityDeserialized.pet_gender  else "female"))
      
      The above code yields to the following output :

      Remark : In practice, the serialized data (in this example, it's petIdentitySerialized) is what we need to send through the network.

    • C++ :
      /* 
         --------------- main.cpp ----------
         ----- Google Protocol Buffer ------
         --------- Serializer and ----------
         ------- Deserializer Example ------
      */
      
      #include <iostream>
      #include <string>
      #include "petIdentity.pb.h"
      using namespace std;
      
      
      int main(){
          GOOGLE_PROTOBUF_VERIFY_VERSION; // it's recommanded by Google to make sure that the correct protobuf library is loaded
          
          /* -------------------------------
             ---- Protobuf serialization --- 
             ------------ process ----------
             -------------------------------
          */
          com_company_pet::PetIdentity petIdentity; // Create an instance of PetIndentity
      
          petIdentity.set_pet_name("Oscar"); // Set pet name to Oscar
          petIdentity.set_pet_age(2); // Set pet age to 2 years
          petIdentity.set_pet_gender(false); // Set gender to female
      
          string petIdentitySerialized;
      
          petIdentity.SerializeToString(&petIdentitySerialized);    
      
          cout << "Serialized protobuf data : " << petIdentitySerialized << endl;
       
      
      /* 
         ---------------------------------------------
         ------ Protobuf deserialization process -----
         ---------------------------------------------
      */
      
          com_company_pet::PetIdentity petIdentityDeserialized;
          
          petIdentityDeserialized.ParseFromString(petIdentitySerialized);
          cout << "\nDeserializing the data" << endl;
          cout << "Cat-Name : " << petIdentityDeserialized.pet_name() << " <===> Cat-age : " << petIdentityDeserialized.pet_age() << " <===> Cat-gender : " << (petIdentityDeserialized.pet_gender()?"male":"female") << endl; 


          google::protobuf::ShutdownProtobufLibrary(); // free all resources
          return 0;    
      }
      
      Executing the above code generates the following output :

      Remark : In practice, the serialized data (in this example, it's petIdentitySerialized) is what we need to send through the network.

Sending protobuf data with ZMQ

As one may expect, protobuf data are expected to be sent through the network. We may use traditional UNIX sockets, however; they can become quickly a bottle in the neck.

ZMQ is an easier, reliable and less cumbersome to use. Previous post already discussed ZMQ. Google Protocol Buffer is cross platform and can be used between multiple languages.
  1. Creating a proto file :
    syntax = "proto3";
    
    package com_company_caesar;
    
    message CaesarCipher {
        string caesar_cipher_text = 1; // Carries caesar cipher
        int32 shift_key = 2; // Shift key (it is equal to 3)
    }
    
  2. Heterogeneous Publisher and Subscriber
    • Python Publisher :
      import caesarCipher_pb2
      import zmq
      import time
      
      def encryptCaesarCipher(plainText, shiftKey):
          cipherText = ""    
          for character in plainText:
              # shift every letter in message by 3
              cipherText += chr(ord(character) + shiftKey) 
          return cipherText
      
      def serializeToProtobuf(msg, caesarCipherProto, shiftKey):
          # fill caesarCipherProto
          caesarCipherProto.caesar_cipher_text = encryptCaesarCipher(msg, shiftKey)
          caesarCipherProto.shift_key = shiftKey
          # return serialized protobuf caesarCipherProto
          return caesarCipherProto.SerializeToString()
      
      # messages to send
      messagesPlainText = ["hello world!", "programming is awesome", "computer science"]
      caesarCipherProto = caesarCipher_pb2.CaesarCipher()
      
      
      portPublisher = "5580"
      # create an zmq context
      context = zmq.Context()
      # create a publisher socket
      socket = context.socket(zmq.PUB)
      # Bind the socket at a predefined port  
      socket.bind("tcp://*:%s" % portPublisher)
      
      
      while True:
          for msg in messagesPlainText:
              # serialize caesarCipherProto into protobuf format
              dataSerialized = serializeToProtobuf(msg, caesarCipherProto, 3)
              print("Plain Text : " + msg + " <===> Caesar cipher : " + caesarCipherProto.caesar_cipher_text)
              print("Protobuf message to send : " + str(dataSerialized)) # display caesarCipherProto data
              time.sleep(1)
              socket.send(b""+dataSerialized) # send binary serialized data
              print("---------------------------------")
              print("---------------------------------")
              print("---------------------------------")
      
    • C++ Subscriber :
      #include <iostream>
      #include <zmq.hpp>
      #include <string>
      #include "caesarCipher.pb.h"
      
      using namespace std;
      
      void DecryptCipherDisplay(std::string cipherText, int cipherKey);
      
      int main(){
          GOOGLE_PROTOBUF_VERIFY_VERSION;
          /* -------------------------- */
          /* Create a subscriber socket */
          /* -------------------------- */
          zmq::context_t context(1);
          zmq::socket_t subSocket(context, ZMQ_SUB);
          // Connect to pyton's publisher binding port
          subSocket.connect("tcp://localhost:5580"); 
        
          cout << "------ Subscriber running ------\n" << endl;
          // Listen for all topics
          subSocket.setsockopt(ZMQ_SUBSCRIBE, "" , strlen(""));
          // Instantiate a CaesarCipher to be filled with received data
          com_company_caesar::CaesarCipher caesarCipher; 
          while(true) {
              
              zmq::message_t zmqMessageReceived; // used to hold zmq received data
              subSocket.recv(&zmqMessageReceived); // Blocks until data reception
              // Map zmq data holder to string
              std::string messageReceived(static_cast<char*>(zmqMessageReceived.data()), zmqMessageReceived.size());
              // Deserialize protobuf data and store them into caesarCipher
              caesarCipher.ParseFromString(messageReceived);
               
              // Descrypt caesar cipher and display received string
              DecryptCipherDisplay(caesarCipher.caesar_cipher_text(), caesarCipher.shift_key());
                 
              cout << "-------------------------------------" << endl;
          }        
      
          google::protobuf::ShutdownProtobufLibrary();
      
          return 0;
      }
      
      
      void DecryptCipherDisplay(std::string cipherText, int cipherKey){
          string::iterator it;
          string PlainTextRecovered;
          for (it = cipherText.begin(); it < cipherText.end(); it++) 
              PlainTextRecovered += static_cast<char>(*it - cipherKey); // reverse caesar cipher
          cout <<  "Reversing caesar cipher : "<< PlainTextRecovered << endl;
      }
      
  3. Testing the communication :